First Option for expanding/collapsing HTML table row

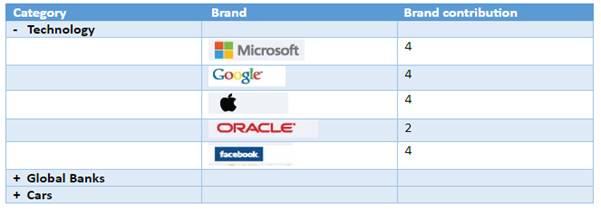
 A common UI will have an HTML table of data rows. When we click on “Expand”, it shows a detailed breakdown of “child” rows below the “parent” row. In a parent row, click on the “+” sign; it expands the child row with detailed information. At the same time, the parent sign toggles to “- “.

Once we click on “ “sign, then it will collapse child rows with parent sign “+”.

The requirements are,

  1. Put a class of “parent” on each parent row (tr).
  2. Give each parent row (tr) an attribute ”data-toggle=”toggle””.
  3. Give each child row cover under <tbody> a class=hideTr.

Below is the sample of the table structure.

  1. <table>  
  2.     <tr  data-toggle=”toggle”>  
  3.         <td >  
  4.             <p id=”Technology” >  
  5.                 <b>  
  6.                     <span class=”plusminusTechnology”>+</span>    
  7.                     <span lang=”EN-IN”>Technology </span>  
  8.                 </b>  
  9.             </p>  
  10.         </td>  
  11.         <td ></td>  
  12.         <td ></td>  
  13.     </tr>  
  14.     <tbody class=”hideTr”>  
  15.         <tr >  
  16.             <td “></td>  
  17.             <td >  
  18.                 <img height=”28″ src=”clip_image001.png” v:shapes=”Picture_x0020_5″ width=”106″ />  
  19.             </td>  
  20.             <td   
  21.   
  22.                 <span lang=”EN-IN”>4</span>  
  23.             </td>  
  24.             <td   
  25.                          
  26. </td>  
  27.         </tr>  
  28.     </tbody>  
  29. </table>  

Script Code

  1. <script src=”https://ajax.googleapis.com/ajax/libs/jquery/1.11.2/jquery.min.js”></script> &nbsp;
  2.   
  3. <script type=”text/javascript”>  
  4.     $(document).ready(function () {  
  5.         debugger;  
  6.         $(‘.hideTr’).slideUp(600);  
  7.      $(‘[data-toggle=”toggle”]’).click(function () {  
  8.         if ($(this).parents().next(“.hideTr”).is(‘:visible’)) {  
  9.             $(this).parents().next(‘.hideTr’).slideUp(600);  
  10.             $(“.plusminus” + $(this).children().children().attr(“id”)).text(‘+’);  
  11.            $(this).css(‘background-color’, ‘white’);  
  12.             }  
  13.         else {  
  14.             $(this).parents().next(‘.hideTr’).slideDown(600);  
  15.             $(“.plusminus” + $(this).children().children().attr(“id”)).text(‘- ‘);  
  16.            $(this).css(‘background-color’, ‘#c1eaff ‘);    
  17.         }  
  18.     });  
  19.     });  
  20. </script>  
Expand/Collapse Table Rows With jQuery

Second option

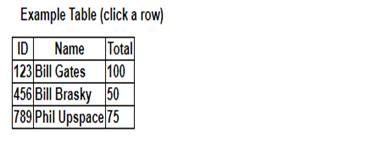
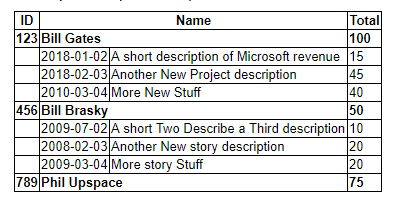
A common UI which will have an HTML table of record rows, in which when we click on “Expand”, it shows a detailed breakdown of “child” rows below the “parent” row.

The requirements are:

  1. Add a class of “parent” on each parent row (tr).
  2. Give each parent row (tr) an id.
  3. Give each child row a class of “child-ID” where ID is the id of the parent tr that it belongs to.
  1.   <table id=”detail_table” class=”detail”>  
  2.     <thead>  
  3.     <tr>  
  4.         <th>ID</th>  
  5.         <th colspan=”2″>Name</th>  
  6.         <th>Total</th>  
  7.     </tr>  
  8. </thead>  
  9. <tbody>  
  10.     <tr class=”parent” id=”row123″ title=”Click to expand/collapse” style=”cursor: pointer;”>  
  11.         <td>123</td>  
  12.         <td colspan=”2″>Bill Gates</td>  
  13.         <td>100</td>  
  14.     </tr>  
  15.     <tr class=”child-row123″ style=”display: table-row;”>  
  16.         <td> </td>  
  17.         <td>2018-01-02</td>  
  18.         <td>A short description of Microsoft revenue </td>  
  19.         <td>15</td>  
  20.     </tr>  
  21.     <tr class=”child-row123″ style=”display: table-row;”>  
  22.         <td> </td>  
  23.         <td>2018-02-03</td>  
  24.         <td>Another New Project description</td>  
  25.         <td>45</td>  
  26.     </tr>  
  27.     <tr class=”child-row123″ style=”display: table-row;”>  
  28.         <td> </td>  
  29.         <td>2010-03-04</td>  
  30.         <td>More New Stuff</td>  
  31.         <td>40</td>  
  32.     </tr>  
  33.   
  34.     <tr class=”parent” id=”row456″ title=”Click to expand/collapse” style=”cursor: pointer;”>  
  35.         <td>456</td>  
  36.         <td colspan=”2″>Bill Brasky</td>  
  37.         <td>50</td>  
  38.     </tr>  
  39.     <tr class=”child-row456″ style=”display: none;”>  
  40.         <td> </td>  
  41.         <td>2009-07-02</td>  
  42.         <td>A short Two Describe a Third description</td>  
  43.         <td>10</td>  
  44.     </tr>  
  45.     <tr class=”child-row456″ style=”display: none;”>  
  46.         <td> </td>  
  47.         <td>2008-02-03</td>  
  48.         <td>Another New story description</td>  
  49.         <td>20</td>  
  50.     </tr>  
  51.     <tr class=”child-row456″ style=”display: none;”>  
  52.         <td> </td>  
  53.         <td>2009-03-04</td>  
  54.         <td>More story  Stuff</td>  
  55.         <td>20</td>  
  56.     </tr>  
  57.   
  58.     <tr class=”parent” id=”row789″ title=”Click to expand/collapse” style=”cursor: pointer;”>  
  59.         <td>789</td>  
  60.         <td colspan=”2″>Phil Upspace</td>  
  61.         <td>75</td>  
  62.     </tr>  
  63.     <tr class=”child-row789″ style=”display: none;”>  
  64.         <td> </td>  
  65.         <td>2008-01-02</td>  
  66.         <td>A short New Games description</td>  
  67.         <td>33</td>  
  68.     </tr>  
  69.     <tr class=”child-row789″ style=”display: none;”>  
  70.         <td> </td>  
  71.         <td>20011-04-03</td>  
  72.         <td>Another Games description</td>  
  73.         <td>22</td>  
  74.     </tr>  
  75.     <tr class=”child-row789″ style=”display: none;”>  
  76.         <td> </td>  
  77.         <td>20011-04-04</td>  
  78.         <td>More Games Stuff</td>  
  79.         <td>20</td>  
  80.     </tr>  
  81. </tbody>  
  82. </table>  

Script Code

  1. <script src=”https://ajax.googleapis.com/ajax/libs/jquery/1.11.2/jquery.min.js”></script> &nbsp;
  2. <script type=”text/javascript”>  
  3.     $(document).ready(function () {  
  4.             $(‘tr.parent’)  
  5.                 .css(“cursor”, “pointer”)  
  6.                 .attr(“title”, “Click to expand/collapse”)  
  7.                 .click(function () {  
  8.                     $(this).siblings(‘.child-‘ + this.id).toggle();  
  9.                 });  
  10.             $(‘tr[@class^=child-]’).hide().children(‘td’);  
  11.     });  
  12.     </script>  
Expand/Collapse Table Rows With jQuery

Introduction

In this article, we will explore how to remote debug a SharePoint custom application in Visual Studio (SharePoint Test sever to Dev Server).

Scenario

An application works completely fine in SharePoint Dev environment but fails to work in the test environment. Then, how do we find out the issue in the test environment and make the application work?

Pre-requisite 

Verify whether GAC manage tool is installed or not. If it’s not, then install GAC Manager.

This problem can be resolved using the remote debugging method. The step-by-step procedure is given to resolve the issue.

Sharepoint Test Environment Remote Debugging Steps

Steps 1

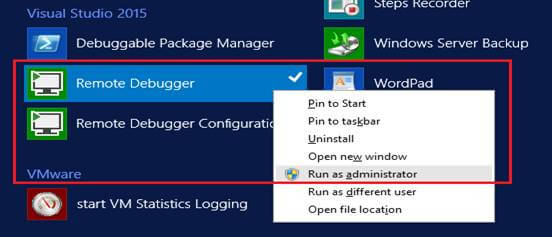
Connect to Test Server ->Find Remote Debugger, right click and run as an Administrator.

Sharepoint Test Environment Remote Debuging

Steps 2

Pop up window for setting the unique TCP/IP Port Number will appear on screen,

Sharepoint Test Environment Remote Debuging

If Remote debugger icon does not appear on the desktop then follow the below steps for remote debugger configuration.

Steps 3

Open Windows Explorer and navigate to the following directory – C:\Program Files\Microsoft Visual Studio 14.0\Common7\IDE\Remote Debugger.

Once you’re in the Remote Debugger directory, double-click on the appropriate directory name based on the processor of your web front-end server (i.e. x64 is most likely what you’ll choose if you’re working with SharePoint 2013).

Double click on the msvsmon file,

Sharepoint Test Environment Remote Debuging

On pop up of the VS remote debugger window Go ->Tools ->permissions, add the username of the Dev server administrator account ->Click Apply ->Ok.

Sharepoint Test Environment Remote Debuging

Steps 4

Run with Administrator open GAC Manager Tool- -> Click following Sharepoint Test Environment Remote Debuging Icon Add your custom solution DLL into GAC Manager -> reset IIS by opening a command prompt by typing “iisreset,

Sharepoint Test Environment Remote Debuging

SharePoint Dev Environment Steps

  1. These final steps of the process will now allow you to connect your instance of Visual Studio with the remote debugging monitor so that you will, at last, be able to step through the C# code of your SharePoint components.
  2. On your workstation, open Visual Studio.
  3. Open your SharePoint site’s code solution file.
  4. Once your solution is loaded, open the appropriate .cs file you wish to debug and place your breakpoint(s).
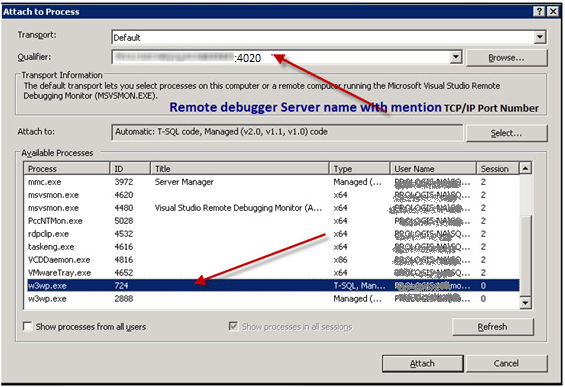
  5. Click Debug -> Attach to Process.

    Sharepoint Test Environment Remote DebugingSharepoint Test Environment Remote Debuging

  6. For Qualifier, update the textbox with the remote debugging server name that you captured in Test Environment Step 3 of the Activate the Visual Studio Remote Debugging Monitor section.
  7. Select the w3wp.exe process that matches the ID that you recorded in Step 5 of Dev Environment to Obtain the Worker Process ID section.
  8. Click the Attach button.
  9. Refresh Test Environment SharePoint application then the debugger will be activated in SharePoint Dev Environment.

Introduction

In this article, I have explored how to add links represented as headings in the Quick Launch area of the user interface using REST API. Here, we tried to add custom navigation node corresponding to the links in the Quick Launch area of the site using REST API using jQuery.

Prerequisites –REST API QuickLaunch EndPoint to use in Add_ins –

/_api/web/Navigation/QuickLaunch

Scenario

I have created the host site and have by default added multiple Quick Launch navigation nodes. Now, let’s say we want to add one Custom navigation nodes ‘’Notebook” in the Quick Launch (i.e., Left Navigation).

SharePoint

Objective

I have added one custom navigation node ‘’ Notebook” to the Quick Launch (i..e Left Navigation) on button click.

Use the procedure given below.

Step 1

Navigate to your SharePoint 2013 site.

Step 2

From this page, select Site Actions | Edit Page.

Edit the page, go to the “Insert” tab in the ribbon and click “Web Part” option. In the Web Parts picker area, go to the “Media and Content” category, select the Script Editor Web Part, and press the “Add” button.

Step 3

Once the Web Part is inserted into the page, you will see an “EDIT SNIPPET” link; click it. You can insert HTML and/or JavaScript, as shown below.

  1. <script type=”text/javascript” src=”../…/SiteAssets/Script/jquery-1.10.2.js”></script>    
  2.     <script type=”text/javascript”>  
  3.         $(document).ready(function ($) {  
  4.   
  5.             $(“#createQuickLaunch”).click(function () { createQuickLaunch() });  
  6.   
  7.         });  
  8.         //Create a Quicklaunch Navigation  
  9.         function createQuickLaunch() {  
  10.             var endPointUrl = _spPageContextInfo.webAbsoluteUrl + “/_api/web/navigation/QuickLaunch”;  
  11.             var headers = {  
  12.                 “accept”: “application/json;odata=verbose”,  
  13.                 “content-Type”: “application/json;odata=verbose”,  
  14.                 “X-RequestDigest”: jQuery(“#__REQUESTDIGEST”).val()  
  15.             }  
  16.             var call = jQuery.ajax({  
  17.                 url: endPointUrl,  
  18.                 type: “POST”,  
  19.                 data: JSON.stringify({  
  20.                     “__metadata”: { type: “SP.NavigationNode” },  
  21.                     ‘IsExternal’: true,  
  22.                     ‘Title’: “Notebook”,  
  23.                     ‘Url’: “http://www.testnotebook.com” &nbsp;
  24.                 }),  
  25.                 headers: headers  
  26.             });  
  27.             call.done(successHandler);  
  28.             call.fail(failureHandler);  
  29.         }  
  30.         function successHandler(data, textStatus, jqXHR) {  
  31.             SP.UI.Notify.addNotification(“Navigation created Successully”, false);  
  32.         }  
  33.         function failureHandler(errorMessage) {  
  34.             alert(“Request Failed: unable to Navigation: ” + JSON.stringify(errorMessage));  
  35.         }  
  36.     </script>  

Final out Put

Click ” Create Navigation” button.

SharePoint

Introduction

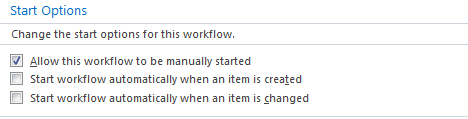
In SharePoint 2013 designer workflow, we uncheck the workflow triggering mechanism on a list item being created or updated. This is done in an effort to prevent the recursive calls to the workflow initiation.
Sharepoint

However, even though it takes quite a few workflow Start options, it is still possible to start the workflow manually from within the calling workflow. The following Option does the trick: start workflow automatically when an item is Created/Changed in Workflow Designer internally (automatically)

Scenario

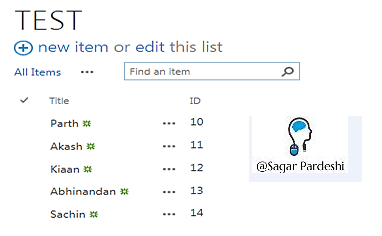
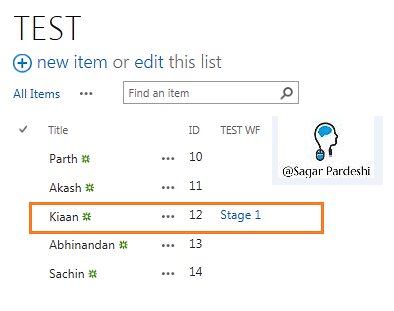
I have created a custom list named “TEST” on the host site and have added multiple items. Now, let’s say we want to “Trigger the Sharepoint 2013 list workflow” on any particular item and send an email to the user as per our need.

Sharepoint

Objective

I wanted to get the item ID of the list item so that I could use it in my HTML to fetch the Item ID of the list item and bind to the drop-down. Once we have selected any Item ID from the list of Item IDs from the drop-down, click on the “Trigger Workflow” button.

Use the procedure given below.

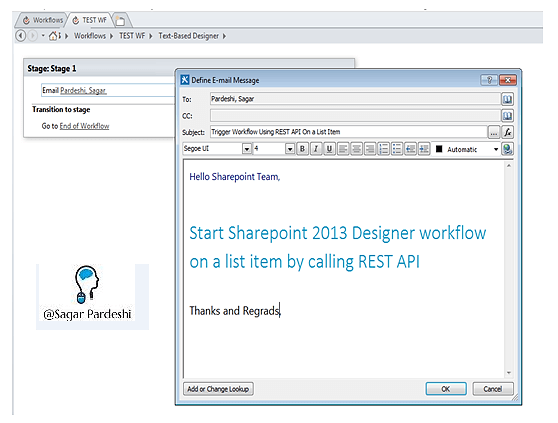
I have created a simple Sharepoint designer workflow for sending an email. Given below is the created mail template.

Sharepoint

In the following code, we fetch the “subscriptionId” in the code as per our Workflow

Step 1

Navigate to your SharePoint 2013 site.

Step 2

From this page, select Site Actions | Edit Page.

Edit the page, go to the “Insert” tab in the Ribbon and click “Web Part” option. In the Web Parts picker area, go to the “Media and Content” category, select the Script Editor Web Part, and press the “Add” button.

Step 3

Once the Web Part is inserted into the page, you will see an “EDIT SNIPPET” link; click it. You can insert HTML and/or JavaScript, as shown below.

  1. <script type=“text/javascript” src=“../…/SiteAssets/Script/jquery-1.10.2.js”></script>
  2.     <script type=“text/javascript”>
  3.         $(document).ready(function ($) {
  4.             ItemIdDropDownBind();
  5.             $(“#StartWorkflow”).click(function () { StartWF() });
  6.         });
  7.         //StartWorkflow
  8.         function StartWF() {
  9.             $.ajax({
  10.                 url: _spPageContextInfo.siteAbsoluteUrl + “/_api/SP.WorkflowServices.WorkflowInstanceService.Current/StartWorkflowOnListItemBySubscriptionId(subscriptionId=’BB20B816-2AEF-4299-B6BF-43910578BA8F’,itemId=’ “ + $(“#drpItem option:selected”).text() + “‘)”,
  11.                 type: “POST”,
  12.                 contentType: “application/json;odata=verbose”,
  13.                 headers: {
  14.                     “Accept”“application/json;odata=verbose”,
  15.                     “X-RequestDigest”: $(“#__REQUESTDIGEST”).val()
  16.                 },
  17.                 success: function (data) {
  18.                     alert(‘Workflow Trigger Successfully’);
  19.                 },
  20.                 error: function (data) {
  21.                     alert(“Error”);
  22.                 }
  23.             });
  24.         }
  25.         function ItemIdDropDownBind() {
  26.             var url = _spPageContextInfo.webAbsoluteUrl + “/_api/web/lists/getbytitle(‘TEST’)/items?$orderby=ID asc&$top=5000”;
  27.             getListItems(url, function (data) {
  28.                 var items = data.d.results;
  29.                 var inputItemIDElement = ‘<select id=”drpItem” name=”options”><option  value=””></option>’;
  30.                 for (var i = 0; i < items.length; i++) {
  31.                     var itemId = items[i].ID,
  32.                      itemVal = items[i].ID;
  33.                     inputItemIDElement += ‘<option value=”‘ + itemVal + ‘”selected>’ + itemId + ‘</option>’;
  34.                 }
  35.                 inputItemIDElement += ‘</select>’;
  36.                 $(‘#ItemID’).append(inputItemIDElement);
  37.             }, function (data) {
  38.                 alert(“An error occurred. Please try again.”);
  39.             });
  40.         }
  41.         function getListItems(siteurl, success, failure) {
  42.             $.ajax({
  43.                 url: siteurl,
  44.                 method: “GET”,
  45.                 headers: { “Accept”“application/json; odata=verbose” },
  46.                 success: function (data) {
  47.                     success(data);
  48.                 },
  49.                 error: function (data) {
  50.                     failure(data);
  51.                 }
  52.             });
  53.         }
  54.     </script>

Final out Put

Select the Item Id and click “Trigger workflow” button.

Sharepoint

Sharepoint
Trigger Workflow Email O/P

Sharepoint

Introduction

In my previous blog, I explored _spPageContextInfo variable properties. This time, I am exploring some SharePoint-provided useful methods and objects in JavaScript. Following are the methods and objects which I use frequently in JavaScript. All these are available Out-Of-The-Box and you don’t need to add any JavaScript library.

JSRequest (Object)
This is used for getting Query String Values. JSRequest class is a JavaScript object in SharePoint. Before using any of these properties, you should call JSRequest.EnsureSetup();

Ex: page URL is http://Siteur/ListName/EditForm.aspx?ID=9

To get a query string value, use the following code.

  1. JSRequest.EnsureSetup();
  2. var Id = JSRequest.QueryString[“ID”]; // Id= 8

Similarly, you can use this –

  1. JSRequest.EnsureSetup();
  2. var fileName = JSRequest.FileName; // current page name
  3. var pathname = JSRequest.PathName; // server relative url

GetUrlKeyValue(parameter, noDecode, url) (Method)
These SharePoint utilities and functions are available on the client-side of SharePoint 2013 to get the value from the query string of the URL.

  1. alert(GetUrlKeyValue(‘a’false‘www.xyz.com?a=fi%20rst’));  

The above statement will return the value ‘fi rst’. Here we are specifying our own URL.

  1. alert(GetUrlKeyValue(‘S’false));  

The above statement will look for a query string variable ‘S’ in the browser URL and return the decoded value.

  1. alert(GetUrlKeyValue(‘S’));  

The above statement will look for a query string variable ‘S’ in the browser URL.

SetUrlKeyValue (parameterName, parameterValue, bEncode, url)
This SharePoint utility is opposite to GetUrlKeyValue. In GetUrlKeyValue function, we will get the value from the query string and in SetUrlKeyValue, we will be setting the value to the query string .

  • parameterName
    The query string name to which we need to set the value.
  • parameterValue
    The parameter value that needs to be set to the keyName.
  • bEncode
    Whether the value needs to be encoded in the URL before setting the value.
  • url
    Url to which the value needs to be set.

    1. SetUrlKeyValue(‘EditPage’‘true’false, window.location.href);  
    2. SetUrlKeyValue(‘EditPage’‘true’false,http://www.google.com’);     
  • ScriptUtility
    This class is the home to six very useful helper methods and one helper field.
  • emptyString
    This field returned an empty string in JavaScript “ ”

SP.ScriptUtility Methods

  • isNullOrEmptyString – Checks if the specified text is null, an empty string or undefined
  • isNullOrUndefined – Checks if the specified object is null or undefined.
  • isUndefined – Checks if the specified object is undefined.
  • truncateToInt – Returns largest integer value that is less than or equal to the specified number if the number is greater than 0 else returns the smallest integer value that is greater than or equal to the number.
  • ScriptUtility : It merely acts as a placeholder for the class name SP.ScriptUtility to hold the Above methods.

escapeProperly(str) (Method)

This function returns escapeProperly function returns the encoded value for provided string.

  1. var s = escapeProperly(“hello world!!”); //s = “hello%20world%21%21”  

SP.Guid

The function SP.Guid.newGuid().toString() returns new GUID at runtime.

  1. var  guid=SP.Guid.newGuid().toString();//guid =”260868ac-2c0c-4494-a40e-22b00aaa0312″  

unescapeProperly(str) (Method)

This function returns unescapeProperly function that returns decoded string for provided encoded string.

  1. var Outstr=unescapeProperly(“this%20is%20a%20test”)//Outstr=”this is a test”  

escapeProperly(str) (Method)

This function returns escapeProperly function returns the encoded value for provided string.

  • Location
  • init.js
  • Parameters
  • str
    1. var urlEncodedValue = escapeProperly(“My Value”); // Returns “My%20Value”.  

TrimSpaces(str)

This function can be to trim spaces on a string. A string that will be trimmed. Return value he trimmed string.

  1. var trimmed = TrimSpaces(” string with spaces “); // Returns “string with spaces”.  

TrimWhiteSpaces(str)

This method trims the white spaces of a string and It also removes spaces created spaces, tabs and linebreaks (\t \n \r \f). A string that will be trimmed.Return valueThe trimmed string.

  1. var trimmed = TrimWhiteSpaces(“\t\tstring with spaces\n”);  // Returns “string with spaces”.  

variable :L_Menu_BaseUrl

This variable contains the base URL of the current site or subsite.

Ex. document.location = L_Menu_BaseUrl + ‘Lists/Tasks/AllItems.aspx’;
variable: L_Menu_LCID

This variable contains the LCID setting of the current site.
Variable: L_Menu_SiteTheme

This variable contains the theme name of the current site.
Lots of this JavaScript Function is already written for you in SharePoint’s “Init.js“and “core.js” file follow the below tables,

Init.js (Function)
  • ULSTrim(str)
  • ULSEncodeXML(str)
  • PageUrlValidation(url)j GetCurrentEltStyle(element, cssStyle)
  • IsCheckBoxListSelected(checkboxlist)
  • STSHtmlEncode(str)
  • DeleteCookie(sName)
  • GetCookie(sName)
  • navigateMailToLink(strBody)
  • navigateMailToLinkWithMessage(strTo, strBody)
  • makeAbsUrl(strUrl)
  • HideMenuControl(menuControlId)
  • displayPNGImage(id,src,width,height,alt)
  • GetUrlKeyValue(keyName, bNoDecode, url)
  • GoToPage(url)
  • TrimSpaces( str )
  • TrimWhiteSpaces( str )
  • FormatDate(sDate, sTime, eDate, eTime)
  • GetElementByClassName(elem, classname)
  • WpClick(evt)
  • GetViewportHeight()
  • GetViewportWidth()
  • RemoveQueryParameterFromUrl(stURL, stParameterName)
  • HasValidUrlPrefix(url)
  • AbsLeft(obj)
  • AbsTop(obj)
  • ExecuteOrDelayUntilScriptLoaded(func, depScriptFileName)
  • ShowPopupDialog(dlgUrl)
core.js(Function)
  • NewItem(url)
  • EditItem(url)
  • RefreshPageTo(evt, url, bForceSubmit)
  • PopMenuFromChevron(e)
  • RefreshPage(dialogResult)
  • OpenPopUpPage(url, callback, width, height)
  • OnIframeLoad()
  • RemoveUrlKeyValue(keyName, url)
  • RemoveParametersFromUrl(url)
  • _GoToPageRelative(url)
  • ShowInPopUI(evt, currentCtx, strUrl)
  • OpenPopUpPageWithTitle(url, callback, width, height,title)
  • AddSourceToUrl(url)
  • ConvertMultiColumnValueToString(subColumnValues,delimiter,bAddLeadingTailingDelimiter)
  • Log(str)
  • CountTotalItems(ctxCur)
  • CountSelectedItems(ctxCur)
  • _addNotificationInternal(span, strHtml, bSticky, tooltip, onclickHandler, bNoAnimate)
  • removeNotification(id, bNoAnimate)
  • SetCookie(name, value, path)

Introduction

In this article, we will explore in Sharepoint 2013, how to show the Sharepoint list item level attachments using REST API and jQuery.  In the previous article, I explained about adding multiple attachments to list item using HTML and jQuery. Now, let’s use some REST API to pull these attachments and display them in the list.

For retrieving attachments, I am using REST API. The URL for all attachment collections can be built like below.

{Site URL}/_api/web/lists/getbytitle([List Title])/items([item ID])/AttachmentFiles

Scenario

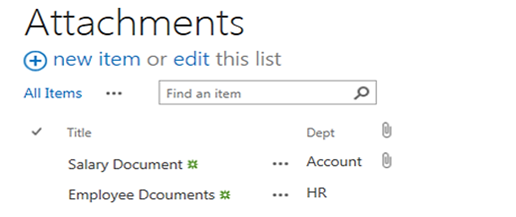
I have created a custom list on the host site named “Attachment”. Add multiple items with attachments and let’s say that we want to show the item level attachments in the item selection.

SharePoint

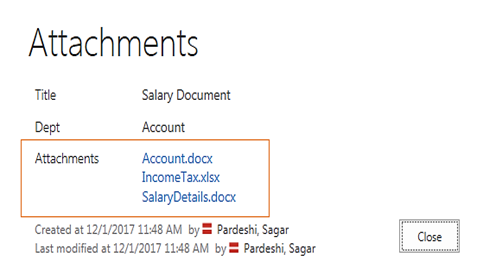
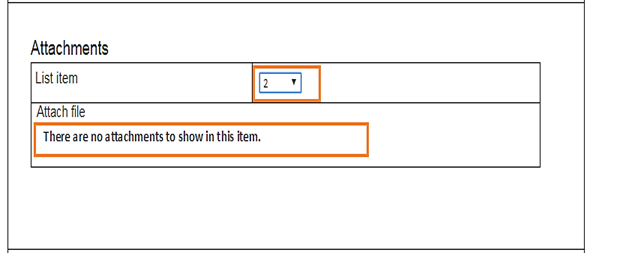
I have an item (Item ID: 1) that has the following attachments
SharePoint

Objective

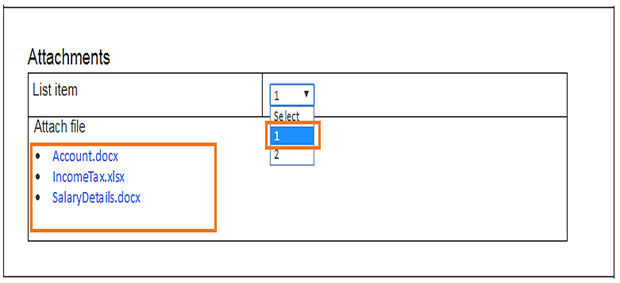
I wanted to get the URLs of the list item attachments so that I could use it in my HTML and to fetch the Item ID of the list item and bind to the drop-down. Once we have selected any Item ID from the list of Item IDs from the drop-down, the attachments of the respective item are shown. An “on change” event is used to fetch and we show the related attachments.

Use the procedure given below.

Step 1

Navigate to your SharePoint 2013 site.

Step 2

From this page, select Site Actions | Edit Page.

Edit the page, go to the Insert tab in the Ribbon and click Web Part option. In Web Parts picker area, go to the “Media and Content” category, select the Script Editor Web Part and press the “Add” button.

Step 3

Once the Web Part is inserted into the page, you will see an “EDIT SNIPPET” link; click it. You can insert HTML and/or JavaScript, as shown below.

  1. “text/javascript” src=“../../SiteAssets/Script/jquery-1.9.1.min.js”>
  2.     “text/javascript”>
  3.         $(document).ready(function ($) {
  4.             var url = _spPageContextInfo.webAbsoluteUrl + “/_api/web/lists/getbytitle(‘Attachments’)/items?$select=Id”;
  5.             getListItems(url, function (data) {
  6.                 var items = data.d.results;
  7.                 var SelectElement = ‘Select’;
  8.                 // Add all the Item Id in Dropdown
  9.                 for (var i = 0; i
  10.                     var itemId = items[i].Id;
  11.                     SelectElement += ‘ + itemId + ‘”selected>’ + itemId + ;
  12.                 }
  13.                 SelectElement += ;
  14.                 $(‘#ItemID’).append(SelectElement);
  15.                 // assign the change event 
  16.                 $(‘#drpListItem’).on(‘change’function () {
  17.                     if ($(this).val() != “”) {
  18.                         var Requestorurl = _spPageContextInfo.webAbsoluteUrl + “/_api/web/lists/getbytitle(‘Attachments’)/items(“ + $(this).val() + “)/AttachmentFiles”;
  19.                         getListItems(Requestorurl, function (data) {
  20.                             var results = data.d.results;
  21.                             var htmlStr = “”;
  22.                             if (data.d.results.length > 0) {
  23.                                 $.each(data.d.results, function () {
  24.                                     if (htmlStr === “”) {
  25.                                         htmlStr = 
  26.  + this.ServerRelativeUrl + “‘>” + this.FileName + 
  27. “;
  28.                                     }
  29.                                     else {
  30.                                         htmlStr = htmlStr + 
  31.  + this.ServerRelativeUrl + “‘>” + this.FileName + 
  32. “;
  33.                                     }
  34.                                 });
  35.                             }
  36.                             else { htmlStr = There are no attachments to show in this item.; }
  37.                             $(‘#attachmentsContainer’).html(htmlStr);
  38.                         });
  39.                     }
  40.                 });
  41.             }, function (data) {
  42.                 console.log(“An error occurred. Please try again.”);
  43.             });
  44.         });
  45.         function getListItems(siteurl, success, failure) {
  46.             $.ajax({
  47.                 url: siteurl,
  48.                 method: “GET”,
  49.                 headers: { “Accept”“application/json; odata=verbose” },
  50.                 success: function (data) {
  51.                     success(data);
  52.                 },
  53.                 error: function (data) {
  54.                     failure(data);
  55.                 }
  56.             });
  57.         }

Final Output

  1. List Item with attachments.SharePoint
  2. List item without attachments.SharePoint


Introduction

In this article I have explored different operations on Sharepoint people picker like:

  • Hide , show and set as Read-only people picker
  • Get and set people picker item
  • Get User Properties & basic property
  • Ensure the user

A lot of people come across the same requirements in Sharepoint people picker.

I developed this POC, which often proves helpful to deal with investigating user properties. Basic property gets associated with People Picker control. Also I explore hide and show people picker control from Sharepoint Default New and Edit list form.

Hide, show and set as read-only people picker

Here, using jQuery, we handle the hide, show, and set as read only people control without using SPUtitlity.

Hide and Show People Picker: In Sharepoint list, default New or Edit form on the basis of condition. Set people picker control as hide and show using jQuery.

SharePoint People Picker
Script code

  1. $(“div[title=’Column Name’]”).hide();
  2. $(“div[title= ‘Account Holder Name’]”).hide();

SharePoint People Picker
Script code

  1. $(“div[title= ‘Account Holder Name’]”).show();  

SharePoint People Picker
Read-only People picker

In Sharepoint list, default New or Edit form on the basis of condition; set people picker control as read-only using jQuery.

SharePoint People Picker
Script

  1. var data = $(“Div [title=’Account Holder Name’] > input”).val ();
  2.       var parsed = JSON.parse(data);
  3.       var UserDisplayName = parsed[0].DisplayText;
  4.       $(“div[title=’Account Holder Name’]”).hide();
  5.       $(“div[title=’Account Holder Name’]”).after(UserDisplayName);

SharePoint People Picker
Get and set people picker item

Set People Picker Item

Set run time people picker value using jQuery In Sharepoint, list default New/Edit form on the basis of current login username.

SharePoint People Picker
Script

  1.         $(document).ready(function(){
  2.             var userid = _spPageContextInfo.userId;
  3.             var requestUri = _spPageContextInfo.webAbsoluteUrl + “/_api/web/getuserbyid(“ + userid + “)”;
  4.             var requestHeaders = { “accept”“application/json;odata=verbose” };
  5.             $.ajax({
  6.                 url: requestUri,
  7.                 contentType: “application/json;odata=verbose”,
  8.                 headers: requestHeaders,
  9.                 success: onSuccess,
  10.                 error: onError
  11.             });
  12.             function onSuccess(data, request) {
  13.                 var Logg = data.d;
  14.                 //var loginName = Logg.LoginName; //get login name
  15.                 var loginName = data.d.LoginName.split(‘|’)[1];
  16.                 ExecuteOrDelayUntilScriptLoaded(function () {
  17.                     setTimeout(function () {
  18.                         SetAndResolvePeoplePicker(“Account Holder Name”, loginName);
  19.                     }, 2000);
  20.                 }, ‘clientpeoplepicker.js’);
  21.             }
  22.             function onError(error) {
  23.                 alert(“error”);
  24.             }
  25.              });
  26. function SetAndResolvePeoplePicker(fieldName, userAccountName) {
  27.        // alert(userAccountName);
  28.         var _PeoplePicker = $(“div[title='” + fieldName + “‘]”);
  29.         var _PeoplePickerTopId = _PeoplePicker.attr(‘id’);
  30.         var _PeoplePickerEditer = $(“input[title='” + fieldName + “‘]”);
  31.         userAccountName.split(“;#”).forEach(function (part) {
  32.    if (part !== “” && part !== null) {
  33.             _PeoplePickerEditer.val(part);
  34.             var _PeoplePickerOject = SPClientPeoplePicker.SPClientPeoplePickerDict[_PeoplePickerTopId];
  35.             _PeoplePickerOject.AddUnresolvedUserFromEditor(true);
  36.    }
  37.         });
  38.     }
  39.     

SharePoint People Picker
Get People Picker Item

Get run time people picker value using jQuery In Sharepoint, list default New/Edit form on the basis of current login username.

SharePoint People Picker

Script

  1. var data = $(“Div[title=’Account Holder Name’] > input”).val();
  2. var parsed = JSON.parse(data);
  3. var AccountName = parsed[0].Key;
  4. alert(AccountName);

Get User Properties & basic property

Without using REST API, dynamically get People picker user, all types of User Properties & basic properties using jQuery

SharePoint People Picker

Script

  1. var data = $(“Div[title=’Account Holder Name’] > input”).val();
  2.        var parsed = JSON.parse(data);
  3.      alert(‘Account Name:-‘+ parsed[0].Key +‘\nDisplay Name:-‘+parsed[0].DisplayText +‘\nUser Name:-‘+ parsed[0].Description +‘\n —–User Properties——-\n’+parsed[0].EntityData.Title +‘\n’+parsed[0].EntityData.Department+‘\n’+parsed[0].EntityData.SIPAddress+‘\n’);

SharePoint People Picker

Ø Ensure the user: In People Control we can ensure user is exist or not in Sharepoint list New and Edit Form

Script
  1. var data = $(“Div[title=’Account Holder Name’] > input”).val();
  2. var parsed = JSON.parse(data);
  3. var isResolved = parsed[0].IsResolved;
  4. if (isResolved == true) {
  5.     return true;
  6. else {
  7.     $(“Div[title=’Account Holder Name’]”).after(“User does not exist”);
  8.     return false;
  9. }

Introduction

In this article, we will explore how to resolve the error that arrives while implementing the validation to enhanced/rich text box of SharePoint 2013 using jQuery. We will call this error the “Zero-width space” issue.

I observed that the mandatory enhanced/rich text box of SharePoint 2013 doesn’t throw an error when we cut the content from it from the edit/new form and it allows us to save the form without any content in the rich text box. The article describes the steps to remove this error.

Sharepoint

The Rich text editor in Sharepoint 2013 inserts “zero width spacing” characters when editing HTML. Unfortunately, these are not visible to the normal user and so is difficult to remove, so much for WYSIWYG! I analyzed that these are visible in Chrome browser.

Solution

Need to avoid the div tags and get data alone from multiline textbox field using the following steps.

Step 1

Navigate to your SharePoint 2013 site.

Step 2

From this page, select the Site Actions | Edit Page.

Go to the “Insert” tab in the ribbon and click the “Web Part” option. In the “Web Parts” picker area, go to the “Media and Content” category, select the “Script Editor” Web Part, and press the “Add button”.

Step 3

Once the Web Part is inserted into the page, you will see an “EDIT SNIPPET” link; click it. You can insert the HTML and/or JavaScript as in the following,

  1. “text/javascript” src=“/Script/jquery-1.10.2.js”>
  2. “text/javascript”>
  3.     var oLoader;
  4.     var attcount = 0;
  5.     var arraycount = 0;
  6.     $(document).ready(function() {
  7.         $(‘h3.ms-standardheader:contains(“Employee Account  Number”)’).append( *);
  8.     });
  9.     function PreSaveAction() {
  10.         var EmpAcctNum = $(“td.ms-formlabel h3.ms-standardheader nobr:contains(‘Employee Account  Number’)”).parent().parent().parent().find(“div.ms-inputBox div.ms-rtestate-write”).text();
  11.         var EmpAcctNum_validatiomsg = You can’t leave this blank.
    ;
  12.         EmpAcctNum = EmpAcctNum.replace(/[\u200B-\u200D\uFEFF]/g, );
  13.         if (IMPONuM.trim() == “”) {
  14.             $(“#EmpAcctNum”).remove();
  15.             $(“td.ms-formlabel h3.ms-standardheader nobr:contains(‘Employee Account  Number’)”).parent().parent().parent().find(“div.ms-inputBox div.ms-rtestate-write”).closest(“span”).after(EmpAcctNum_validatiomsg);
  16.             return false;
  17.         } else {
  18.             $(“#EmpAcctNum”).remove();
  19.             return true;
  20.         }
  21.     }

Output

Before,

Sharepoint
After,
Sharepoint

Introduction

This article is for beginner level Sharepoint developers and it explores how to debug SharePoint custom applications along with the standard ways to debug.

Debug a Microsoft SharePoint Custom Web part with Visual Studio

SharePoint custom visual web part is executed and debugged by the worker process which is a Windows process (w3wp.exe).

Here are the steps to debug a web part in SharePoint.

Step 1

Open the project and set appropriate breakpoints.

Step 2

Create a Web Part page on the default SharePoint site.

Step 3

Add the Web Part to the page.

Step 4

  • Attach the debugger to the W3wp
  • In the Debug menu in Visual Studio .NET, click “Processes”.
  • Verify that the “Show system processes” check box is selected.
  • Verify that the “Show processes in all sessions” check box is selected.
  • Under “Available Processes”, click exe in the Process list, and then click “Attach”.
  • Under “Choose the program types that you want to debug”, select Common Language Runtime.
  • Now, click OK and then “Close”.
  • Follow the below steps for finding the application related Work process,

    Open CMD -> cd C:\Windows\System32\inetsrv-> appcmd list wp

    Sharepoint
    Sharepoint

Debug a Microsoft SharePoint Timer Job with Visual Studio

SharePoint timer jobs are tasks executed on a scheduled basis by the Windows SharePoint Services timer service (owstimer.exe). They are analogous to scheduled tasks,

  1. First, deploy your solution containing your timer job to SharePoint. From Visual Studio, click “Build” and then “Deploy Solution”.

    Sharepoint

  2. Open Windows Services. ( Click the “Start” button and type Services; or alternatively, this can be accessed from Control Panel > System and Security > Administrative Tools).
  3. Select the service namedSharePoint Timer Services. This ensures that the latest DLL is loaded for your timer job.

    Sharepoint

  1. From Visual Studio, attach the debugger to the process named OWSTIMER.EXE. To do so, select “Debug and Attach to Process”. You may need to tick the check box “Show processes from all users” to find OWSTIMER.EXE.

    Sharepoint

Introduction

SharePoint Designer 2013 provides the capability to save a workflow as a template. Saving a workflow as a template is also known as packaging the workflow. This capability is absent in Sharepoint 2010 List Workflow. In this article, we will explore all the steps regarding Packaging, Deploying and Workflow registration. In Sharepoint 2010/2013, not all workflow types can be saved as template. The following table shows the workflow types that can be saved as template.

Workflow type SharePoint 2010 Workflow platform SharePoint 2013 Workflow platform
List Workflow No Yes
Site Workflow No Yes
Reusable Workflow Yes Yes

Scenario

You’ve created a SP Designer Workflow in one (test) environment and want to deploy onto another (Production) environment. Follow the below steps to move the workflow to other (production) environment site:

Create Solution – Package a workflow by using SharePoint Designer 2013

In order to use this workflow on another Server, you have to save this workflow as a SharePoint Solution package (.wsp file), and then deploy it as a solution on the other server (Production).

To package a workflow, follow these steps:
  1. Open site in SharePoint Designer 2013.
  2. On the “Workflow Settings” tab in the ribbon, click the “Save as Template” button in the “Manage” section, as shown in the figure.

    SharePoint

  3. The .wsp file is now located in the Site Asset library in the Site Collection on your Test Server.
  4. Go to Site Content => Site Assets and you will find Exception Approval .wsp file.
  5. Download a copy of this file to any directory on your computer.

Deploy a SharePoint solution package

  1. Open Internet Explorer and navigate to the site collection you want to deploy the workflow in.
  2. Copy the .wsp file from your computer to a local directory on your Production Server.
  3. Click “Site Actions” and select “Site Settings”.
  4. In the Web Design Galleries section, click Solutions.
  5. Click the “Upload Solution” button to upload the .wsp solution, as shown in the figure.


    Figure – Upload Solution button

  6. Activate the solution by clicking “Activate”.

    SharePoint
    Figure – Activate Solution dialog and button

After a workflow solution has been activated for a site collection, just follow this procedure.

Activate the workflow feature

  1. Open “Site Settings” on the site where you wish to activate the workflow feature.
  2. In the “Site Actions” group, click “Manage site features”.
  3. Click “Activate” next to the workflow feature, as shown in the figure.

    SharePoint
    Figure – Activate workflow feature for site

Note

In workflow, if you are using an app, then you must Register workflow App permission after deployment.